 Rated Excellent
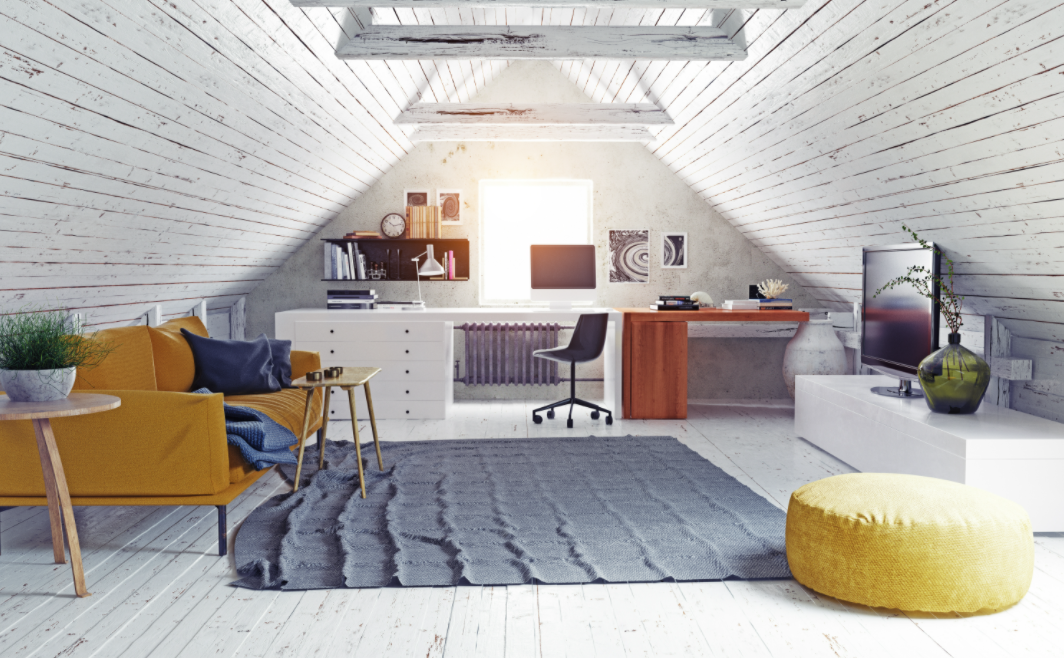
Turn Your Attic Into a Living Space
Looking to turn your attic into a living space? This is a perfect and affordable way of adding more space to your home, without the need to invest in a whole new extension. Whether you’re looking for a study or work space, an extra room for your family and friends to stay in, or simply want somewhere to relax and block out distractions, this guide will help you to transform your attic into a space that is a pleasure to be in.
We will focus on adding a roof window to add light to your space, insulating your attic space, and installing drywall for the walls and ceiling.
How Much Does an Attic Conversion Cost?
This depends on exactly what you want to do with your space and how you want it to look. The size of your attic will also influence the price. If your attic meets all the basic safety requirements and it is a case of insulating the room and then making it accessible and aesthetically pleasing, then it will likely cost between $1000 - $2700.
Materials and tools needed:
Roof window
Safety knife
Screwdriver
Tape measure
Loose fill blower
Level of expertise: Intermediate to advanced
Time: 20 - 100 hours (depending on the size of your attic and your level of experience).
Encourage Natural Light with an Attic Window

Estimated time: 7 hours
Before insulating your space and adding drywall, it is a good idea to encourage natural light into the space by adding an attic or roof window. This will not only lighten the space, it will also improve and aid ventilation. Each window is installed differently, but the windows we sell each come with clear installation instructions suitable for people with an intermediate level of experience.
Doing this before other steps is beneficial to prevent any damage to added insulation and drywall.
Insulating Your Attic for Warmth and Comfort

Estimated time: 10 hours
Insulation is a key part of your attic. Proper insulation not only keeps the house warm but it is absolutely essential if you want to use the space for living in. From the many different materials to choose from to how much insulation you’ll need, there’s many things you need to think about before starting the process.
One of the most important things to know about insulation is the R-value and what value you will need. Typically, it is recommended to look for: an R-value of 30 for warm climates; an R-value of 38 for mild climates; and an R-value of 49 for colder climates. The next step is to think about the kind of material you want. You can choose from: fiberglass, cellulose, mineral wool and cotton. Once you’ve chosen the material you’d like to use and you have evaluated your space, it’s time to get to work and create a warm and cosy space.
Step 1: Clear the attic and secure any electrical systems
Tools you’ll need for this step:
- Safety knife
- Gloves
- Hard hat
- Safety goggles/glasses
- Screwdriver
- Tape measure
The first step is simply a preparation step. It involves removing anything you already have in the attic and removing any floorboards that obstruct the insulation layer. It’s important to work with any empty space when insulating your attic so you can get in all the corners, joints and cover all of the base area.
You’ll also need to secure any electrical features in the space so that the insulation isn’t too close. You can do this very easily by boxing off any plug sockets or electrical points with small pieces of wood. Ensure there is a gap between the electric source and the insulation of at least 4 inches.
Step 2: Inspect your existing insulation
Tools you’ll need for this step:
- Gloves
- Hard hat
- Mask
- Safety goggles/glasses
- Tape measure
The next step is to check what insulation you already have in the attic. This will determine what you need to replace or add to reach the R-value necessary for your climate. To understand the space you’re working with, measure the gap between joists, as well as, the depth of the joists. This will allow you to buy the correct amount of insulation - or at least an approximate amount to add to your space.
If any of the insulation is ruined, damaged or rotting then simply get rid of it and replace it.
Step 3: Installing the insulation
Tools you’ll need for
this step:
- Gloves
- Hard hat
- Mask
- Safety goggles/glasses
- Tape measure
- Loose fill blower
For this step, we’ll guide you on how to install loose fill insulation. Loose fill insulation is often better as it gives you more freedom to use the material, rather than cutting it to size. This also results in less waste! If you have a lot of difficult spaces in your attic, then this is certainly your best option.
You can install loose fill insulation by hand or with a loose fill blower - which can be purchased at most hardware stores. We recommend a loose fill blower to ensure an even amount of insulation and for saving a lot of time!
Before laying insulation down, install a vapor barrier below where the insulation will go to prevent moisture contaminating the insulation. This goes in between the joists and frame of your attic.
For the insulation, start laying it in the far corner and move towards the attic access point. If you don’t have a loose fill blower and you’re doing this by hand, take care to ensure it’s as even as possible.
Once you’re done, you can relay the floor boards and get to work on the next steps!
Installing Drywall to Your Attic Walls and Ceiling

Estimated time: 7 hours
Tools you’ll need for this step:
- Tape measure
- Drywall
- Screws
- Screwdriver
Once you’ve finished installing the insulation, it’s time to finish your walls. Adding drywall will really make your attic conversion take shape and have the space looking like a proper room which you can decorate however you like.
Step 1: Measure and cut the drywall
Use a tape measure to measure the height and width between joists and cut the drywall boards according to this size. It is recommended to start with the ceiling and then work down to the walls.
Step 2: Install the drywall
Once the drywall is cut to size, start screwing drywall screws into the drywall sheets at a height convenient to you. You’ll probably need an extra pair of hands here to make sure the board doesn’t move as you’re screwing it to the wall. When the middle screws are in place, you can start adding the rest. Repeat the process for the whole of the area.
Finish Up Your Attic By Decorating and Adding Accessories

Now that the tough parts are complete, it’s time to start decorating your space to your liking. Whether you’re looking to relax or study, you can kit your new space out with a desk and chair or a nice, comfy sofa. If you still need to install an attic ladder, why not take a look at our range of attic ladders for ease of access?
We hope you have found this guide helpful. If you’d like any more information on the products we sell, please feel free to contact us by calling or emailing, one of our team will be happy to help.

